Deploying static website in AWS through CI CD pipeline using Github and Jenkins

I am a DevOps and Cloud enthusiast currently exploring different AWS services and DevOps tools.
Are you in search of a tutorial that shows the easy peasy way to host your static website with some CI CD pipeline? What if I say you are at the right place? There are lots of tutorials and everyone mostly talk about deploying static website allowing bucket access publicly from the internet but in this tutorial, we will be serving the website content without allowing bucket access publicly from S3 in an easy way. We will be serving the website through CloudFront in a secure and faster way.
The Architecture:
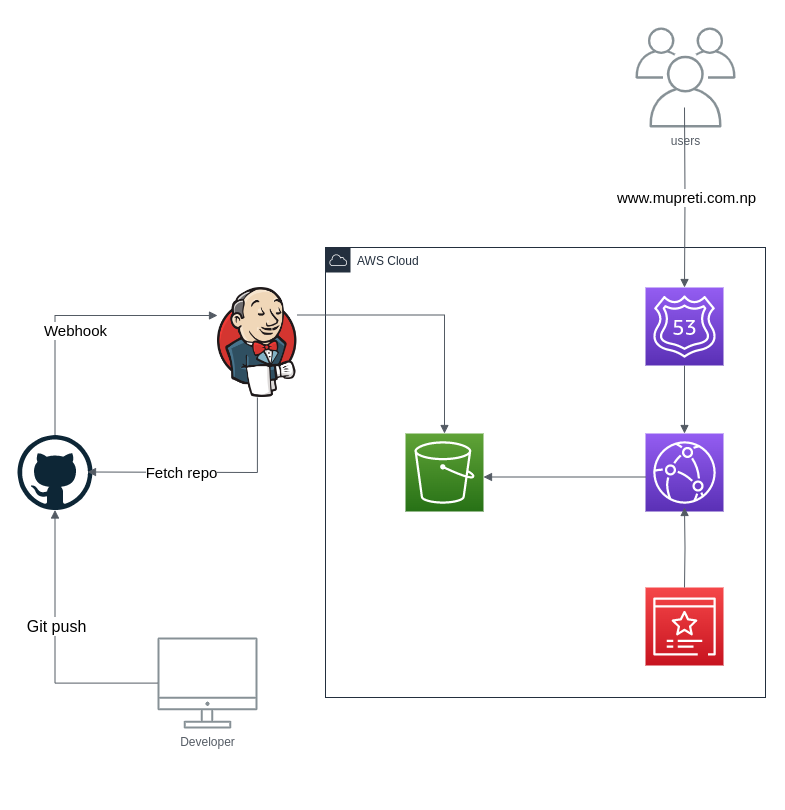
Isn't the architecture simple? The implementation is as easy as this architecture. Be with me and We will walk together hands-on.
Step 1: Sign up for the AWS Account (Free tier eligible)
To continue the deployment of your static website, you need to have an AWS account. You can follow the steps mentioned here:
https://docs.aws.amazon.com/AWSEC2/latest/UserGuide/get-set-up-for-amazon-ec2.html#sign-up-for-aws
A quick tip: You can deploy a static website from your free tier account so go and sign up for the account.
Step 2: S3 Bucket Creation
An S3 bucket, also known as an Amazon Simple Storage Service bucket, is a cloud storage resource provided by Amazon Web Services (AWS). It allows you to store and retrieve any amount of data at any time from anywhere on the web. It is an object storage method.
Goto Services -> S3 -> Create Bucket
Bucket Name: Keep the bucket name unique and for now it should be your domain name. For example: my domain name is mupreti.com.np ( you can exclude or include www but later it should be the same in Route 53 ) so my bucket name will be mupreti.com.np
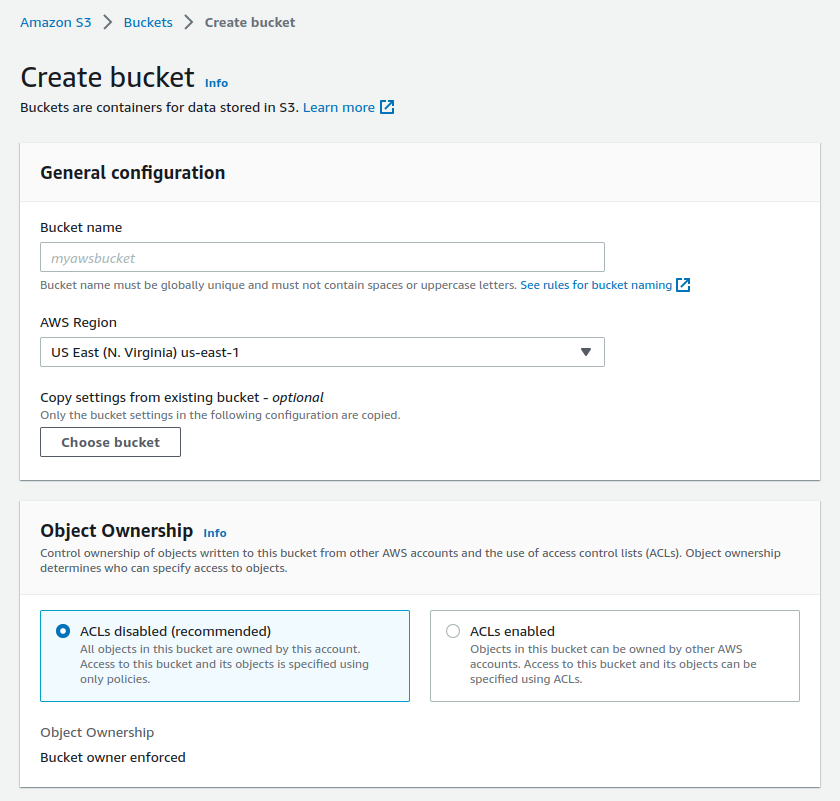
AWS Region: This is the region where you will like to store the buckets.
Block all public access: Most people prefer keeping it open while serving static websites but we will be using CloudFront and SSL/TLS certificate to serve the website content. so we will block public access in our case.
Keep the other configuration default for now.
Now your bucket will be created. Go inside the bucket and upload the file. Prefer keeping the main html file as index.html as an S3 searches file named with index to serve. If you have CSS and simple js inside the folder, you can upload that too.
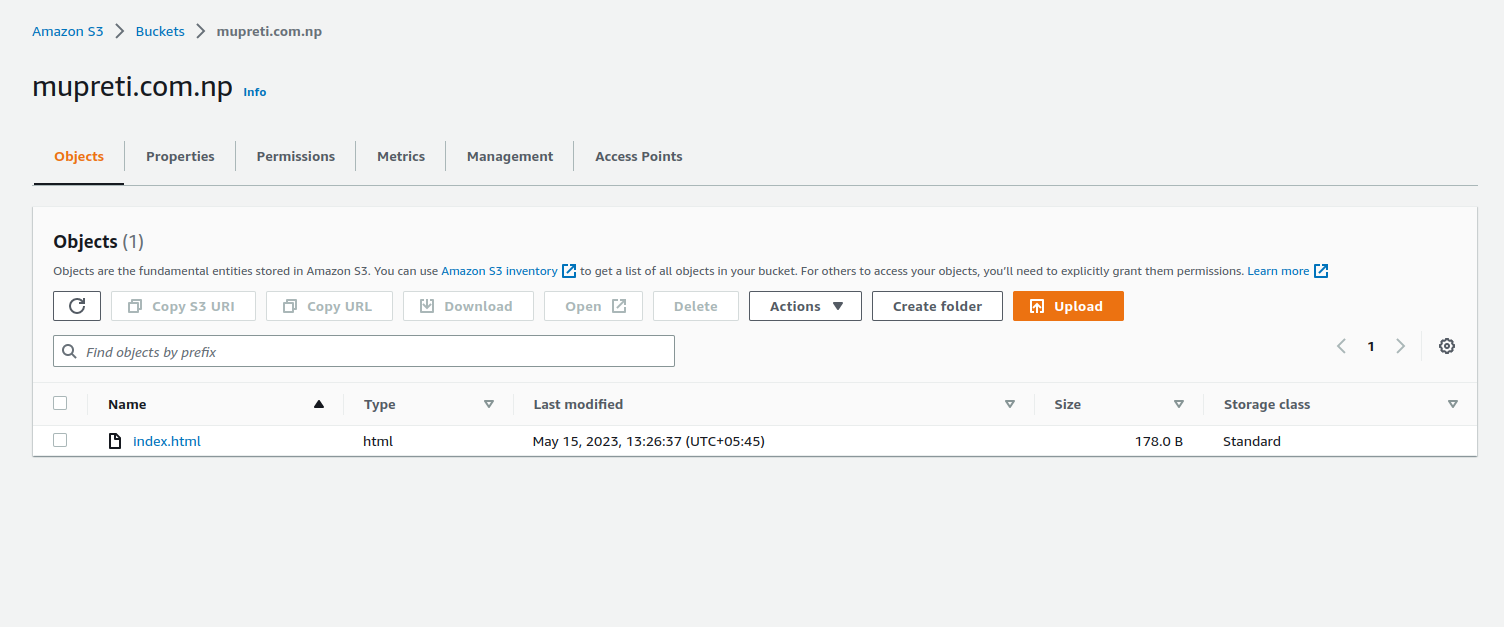
After your files have been uploaded, you will see something like the above image. Here, I have only the index.html file.
You can see the properties tab. Click on that and you will find the property to host a static website at the bottom.
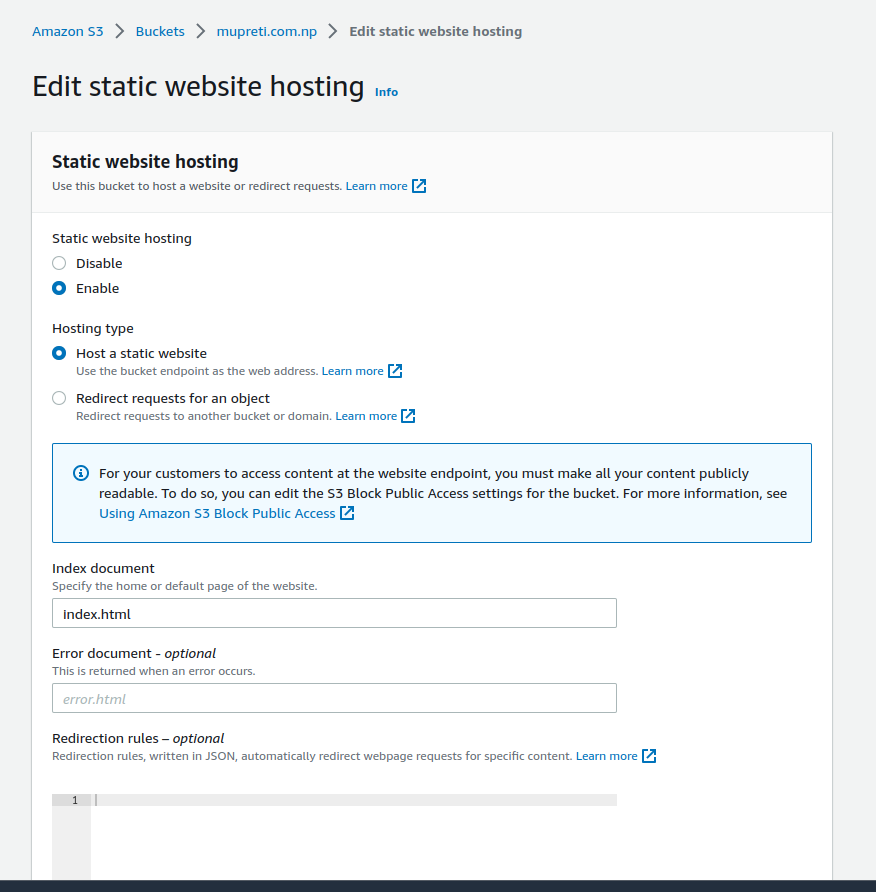
The edit button brings you to this interface. You now enable static website hosting. There are two options in hosting type viz. Host a static website which refers to hosting your static website directly and Redirect requests for an object which redirects one bucket to another. Give the index document name an index.html which is your main HTML file. You also have the optional choice to provide an error document which is error.html that can show some beautiful error page instead of AWS's default ugly error page.
After you have enabled static web hosting, you will get the website endpoint at the bottom of the properties tab. You just click on that and you will see your website. Wait you didn't see it? It might be because we have blocked public access and also we have forgotten to provide a bucket policy to our bucket. So now let's visit the permission tab inside the bucket.

Did you see the bucket policy option? Just click on the edit button and write the policy there. You don't have to create your own. AWS has provided the bucket policy for you. You can find it here. https://docs.amazonaws.cn/en_us/AmazonS3/latest/userguide/HostingWebsiteOnS3Setup.html
You just added a bucket policy to grant public read access to your bucket. When you grant public read access, anyone on the internet can access your bucket. But still, your website is not available on the Internet. You can check it with the endpoint.
Under Buckets, choose the name of your bucket.
Choose Properties.
At the bottom of the page, under Static website hosting, choose your Bucket website endpoint.
Your index document doesn't open in a separate browser window.
If you want to temporarily view the website you can allow all public access and then try to access it again. Hola, you have your website ready.
Step 3: Accessing through Route 53
Amazon Route 53 is a highly scalable and reliable cloud-based Domain Name System (DNS) web service provided by Amazon Web Services (AWS). It allows you to manage the DNS records for your domains, such as registering domain names, configuring DNS routing, and resolving domain names to the appropriate IP addresses.
Goto Services -> Route 53 -> Hosted Zone -> Create Hosted Zone
Create hosted zone: It will create a hosted zone for you which includes the NS records and SOA records. The NS records provided by AWS now should be updated in your domain service provider.
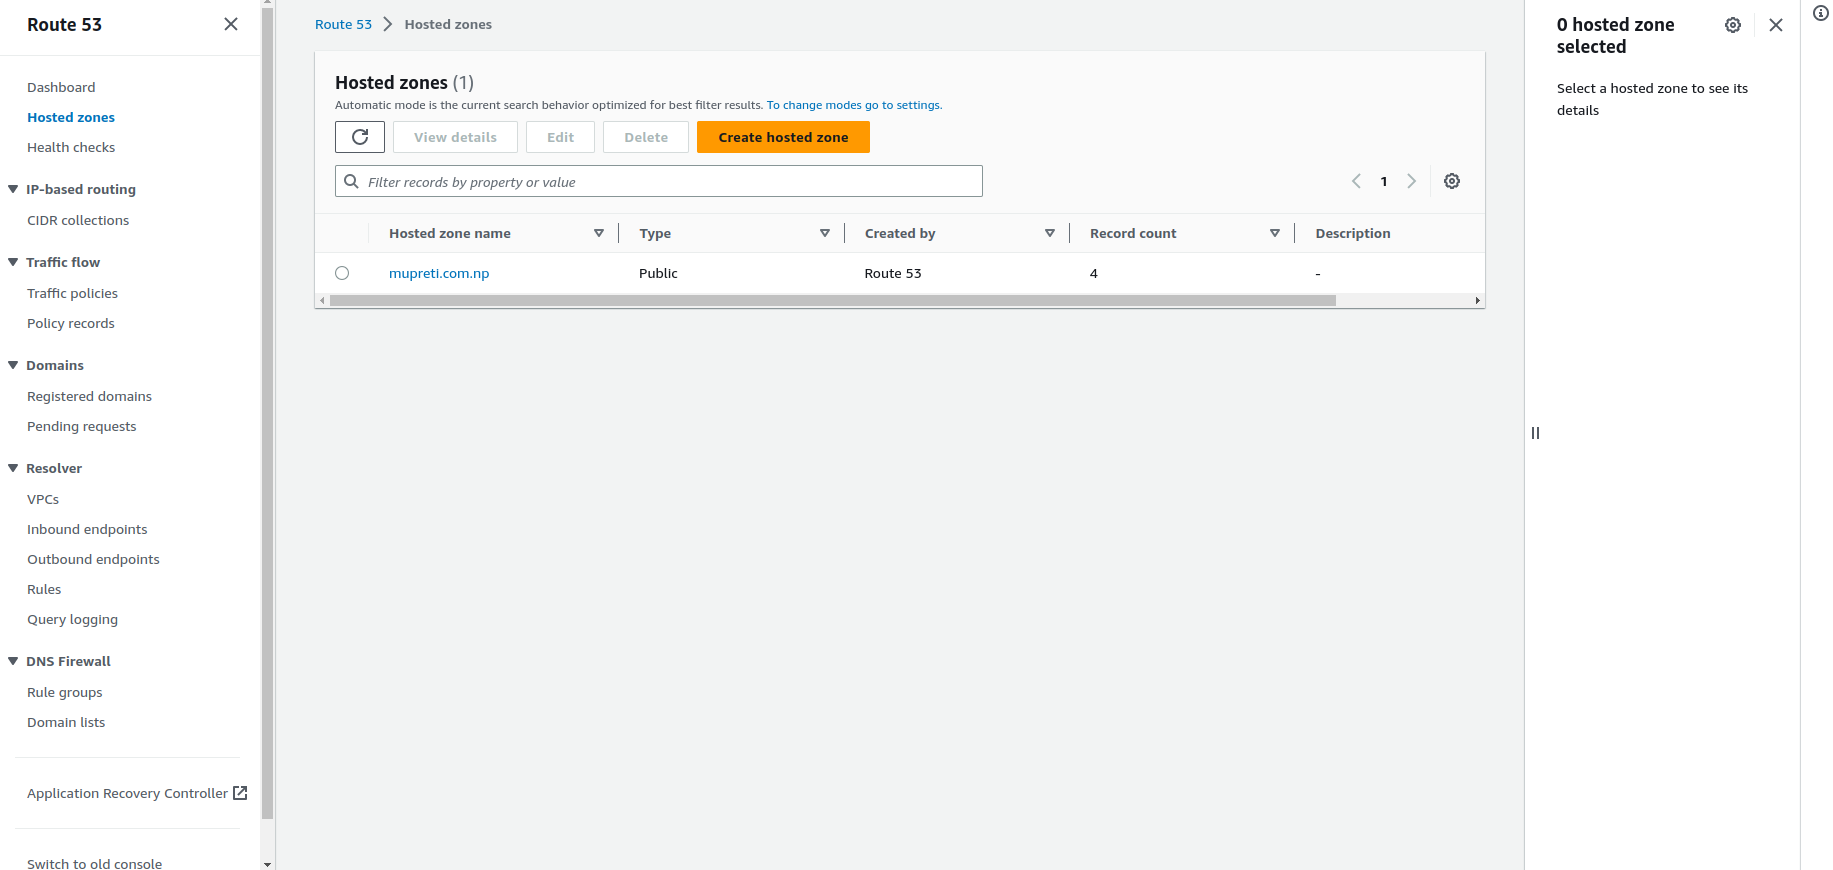
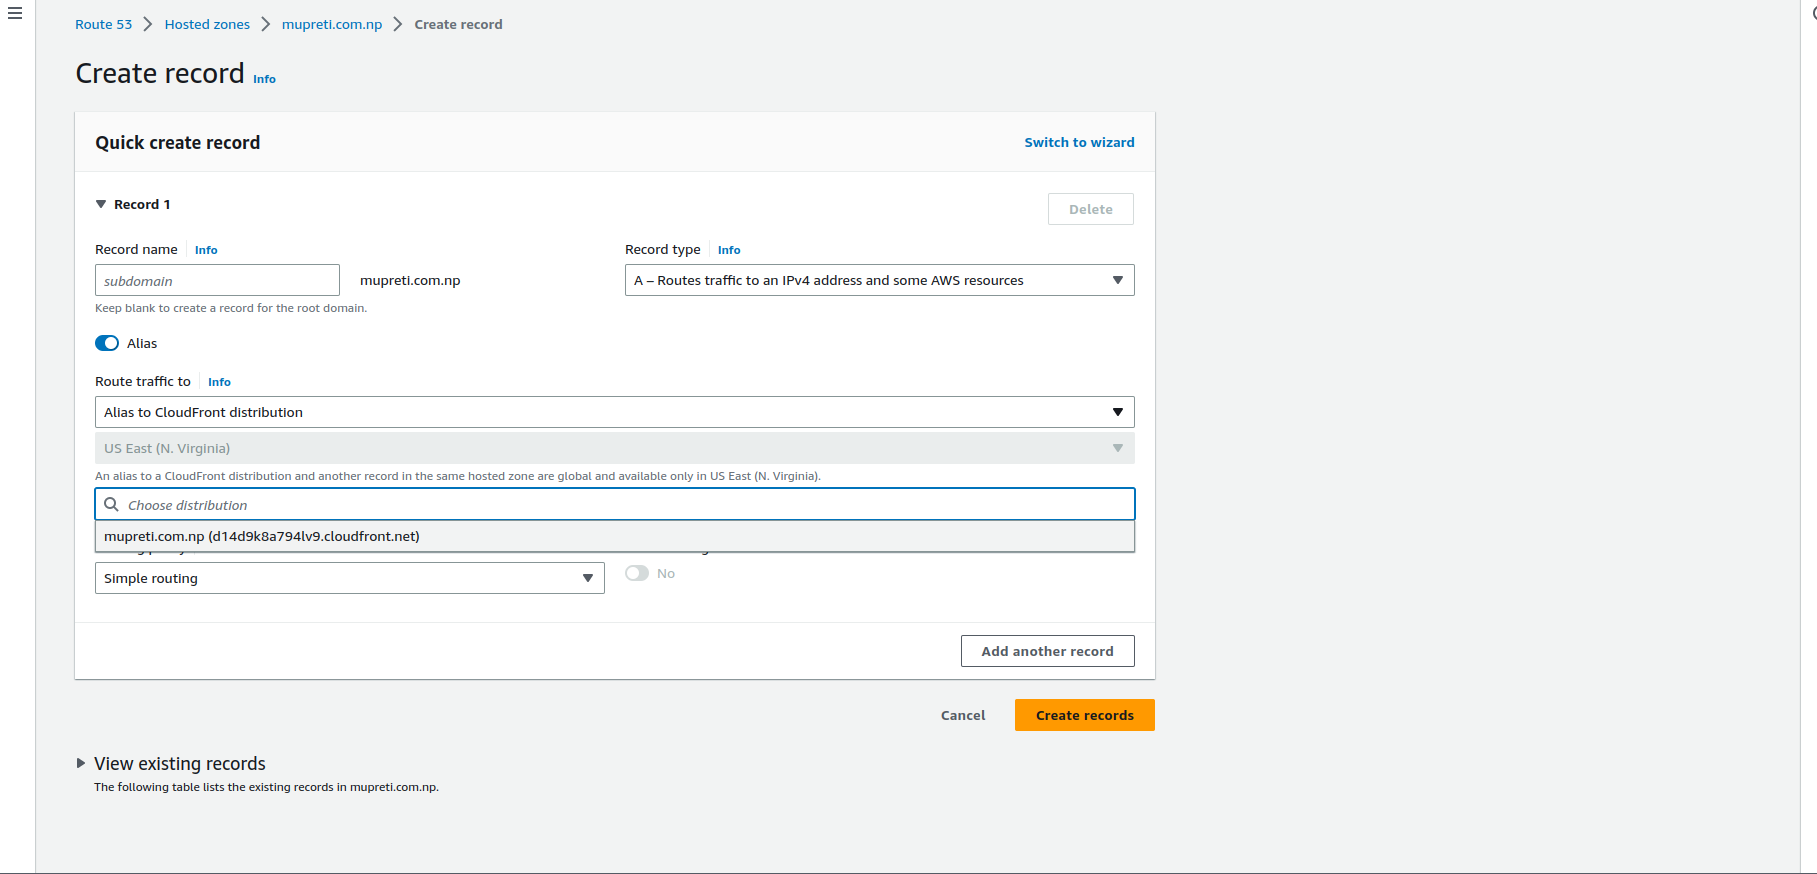
Inside hosted zone click on the new record, and you will see an interface like this.

I have already populated some data but don't panic I will walk you through it in detail. When you click on you will see alias is not selected and you might see this interface or another type of interface. To change the interface click on the above switch to the wizard. Now let's walk through together.
Record name: Record names that you want to keep. It might be your domain subdomain your anything. If it's your domain name, leave it empty.
Record type: It refers to the traffic to be directed to. A record, CNAME, MX and other different records are available and you can explore each of them on your own.
Alias: Do you want to point to a direct IP address or values or the reference to that? Here, we are referring to the S3 endpoint that we have in our S3 bucket so keep it on.
Route traffic to After alias is on, you will see the option as in the image. Currently, we are planning to route traffic to the S3 website endpoint so select that.
Region: Where is your bucket hosted? Remember at the beginning where you created it.
Enter S3 endpoint: Automatically your S3 endpoint will be populated and choose the correct one for that domain.
Routing policy: How you want to route the traffic. For now, you can leave it as default.
Evaluate target health: By evaluating target health, Route 53 checks the responsiveness and status of the targets (such as IP addresses, domain names, or load balancers) that you have configured for a particular health check. It determines whether the targets are healthy and able to handle incoming requests effectively.
After you have created this record, click on the domain name and you will be able to see the website.
Note: You have to uncheck the block public access in the s3 bucket.
You will see the website is now pointing to your custom domain name but did you notice the security of your website? Well, now we will secure it
Step 4: Configuring Cloudfront
SSL (Secure Sockets Layer) and TLS (Transport Layer Security) are cryptographic protocols designed to provide secure communication over the Internet. They establish an encrypted connection between a client (such as a web browser) and a server, ensuring that data transmitted between them remains private and secure.
The custom domain is now pointing to our website but we are not able to secure it. For securing and caching the content faster and in a more secure way, we will be using CloudFront.
Goto Services -> CloudFront -> Create Distribution
Creating distribution is a bit long but not so complicated process. Let's walk through it. (The option that I will not mention, you can leave them default)
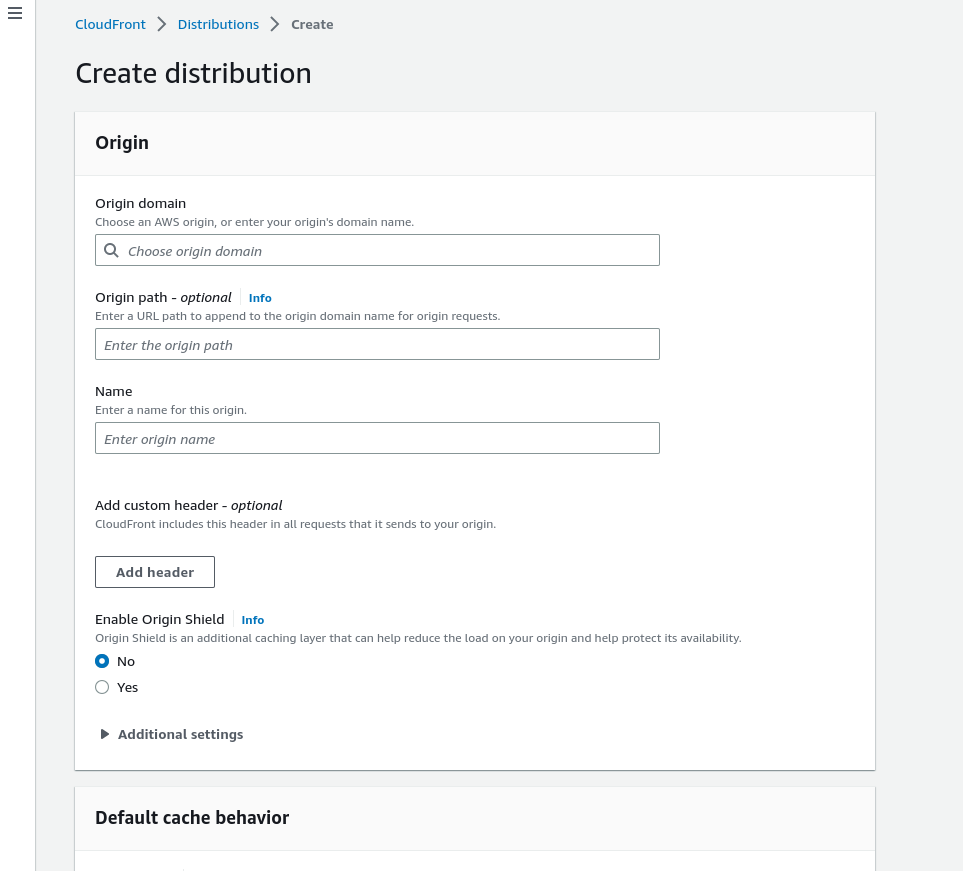
Origin domain: You have to write the S3 endpoint but don't panic to write manually. The auto-populated endpoint will be visible when you click here and select the one that is your required domain endpoint from S3.
Origin path and Name: The origin path is optional so leave it blank. The name will be populated automatically when you fill in the origin domain.
Origin Access (It will be populated after origin domain name entry): This will help to access your S3 bucket only from Cloudfront distribution. We will choose the 'Legacy access identities'. Use a CloudFront origin access identity (OAI) to access the S3 bucket. Click on create new OAI and the new policy will be created. You will have the option to update the bucket policy. This will update the OAI policy in your bucket policy which will help to block public access from S3 and access the website content only through the distribution.
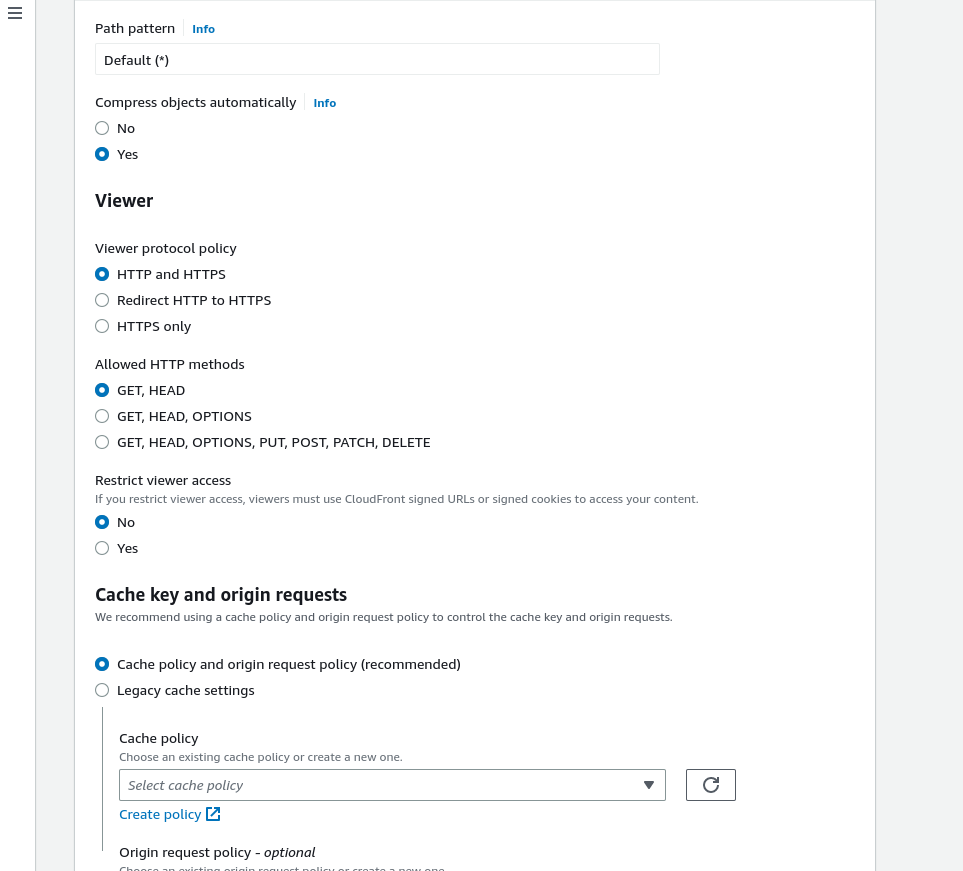
Viewer protocol policy: Choose to redirect HTTP to HTTPS so that all the HTTP traffic will be redirected to HTTPS.
Allow HTTP Methods: For the static website, you can leave it default on GET AND HEAD.
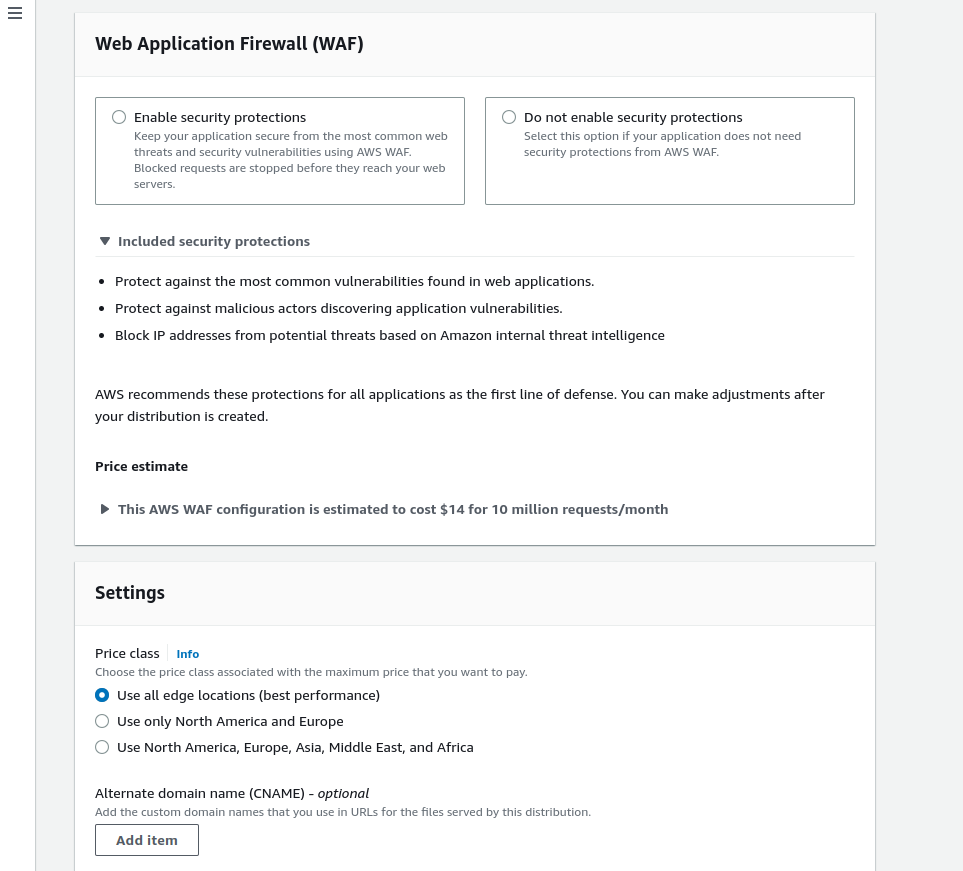
Leave the other default option and choose Do not enable security precautions if you want to save money for now for your static website.
Price class: It refers to caching the content in how many edge locations for faster access to your website. There is a tradeoff between price and speed.
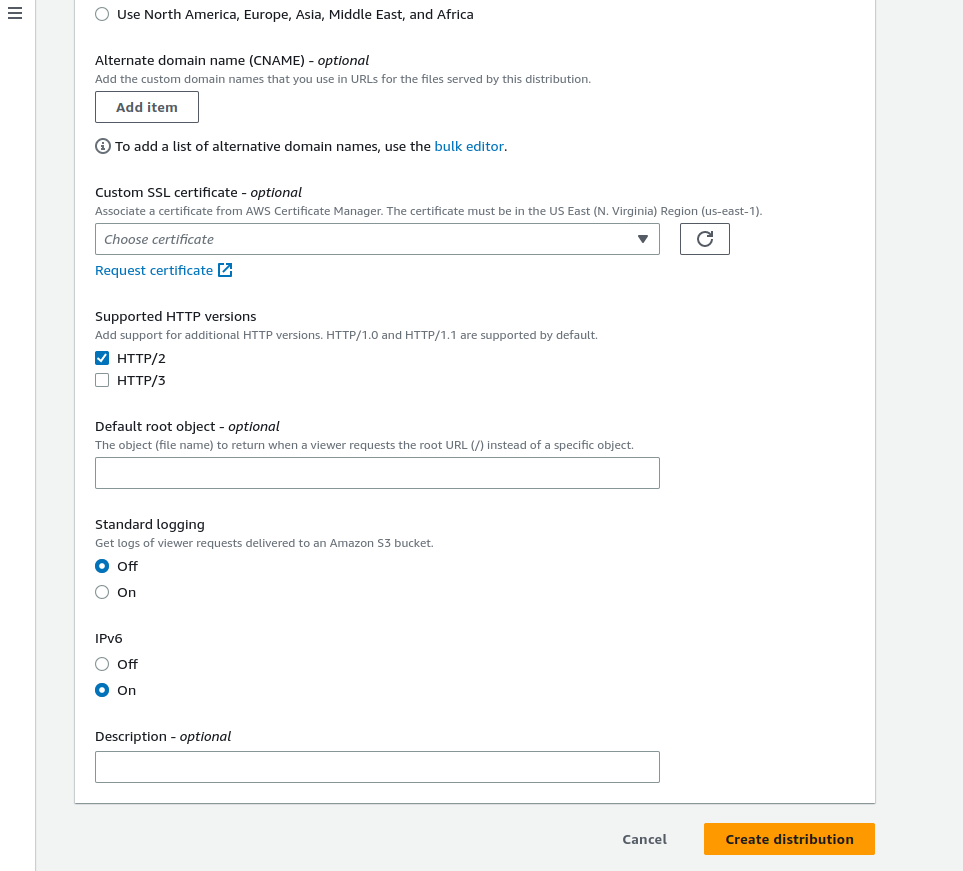
Alternate domain name: In the alternate domain option provide the domain name for your website. Do you remember that we have created a bucket named mupreti.com.np ( in mine, it will be different from yours)? Type that domain name in the alternate domain name option. It might be optional but don't leave it blank.
Custom SSL Certificate: This is also optional if we don't want to secure our website but this is what we need now. So, we will click on the request a certificate. It will take you to the AWS Certificate Manager.
Request a certificate
After clicking on the requested certificate, you will have to complete the steps to get a certificate.
Click on Request a public certificate.
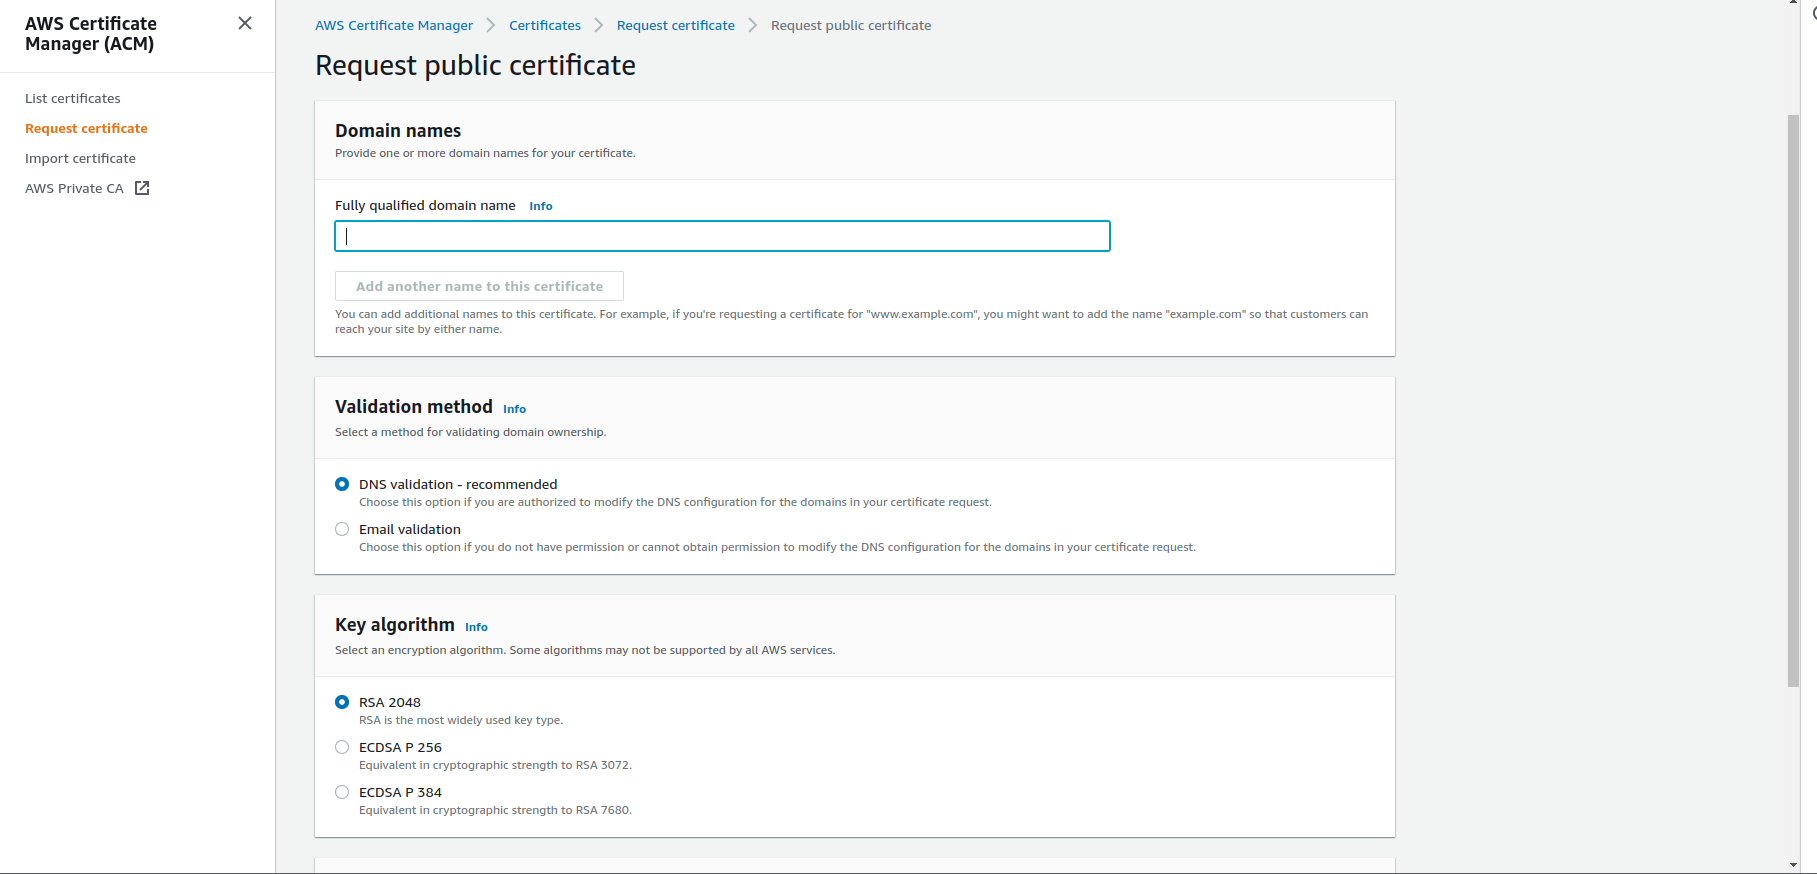
Fill up the blank now:
Fully qualified domain name: Type the domain name for which you want to use the certificate.
Pro tip: In my case type mupreti.com.np for the domain name and *.mupreti.com.np for all the subdomains.
Validation method: You have to validate that the domain is yours to claim the certificate. In this case, as recommended by AWS, domain validation is better. After that leave other default and click on request. You will see your certificate pending. Click on view certificate or certificate name, you will see CNAME records to insert into the Route 53 to verify it. You will see the option of exporting to Route 53. Click on that and it will automatically insert the record in your required hosted zone.
After that, return back to the Cloudfront and refresh that small refresh icon beside the request custom certificate option. Drop down and you will see your verified certificate.
Default root object: It might be optional but don't leave it blank and type your index.html file name so when the website is loaded default page loads automatically. Leave other as default and click on create. Now your distribution is created but it will take some minutes to properly deploy in different edge locations.
Similarly, for your www.mupreti.com.np (your domain) set up another CloudFront distribution and attach the policy again in the S3 bucket policy. You will have access to the website through this distribution too.
Goto Services -> CloudFront -> Distribution -> Invalidations Tab -> Create Invalidations
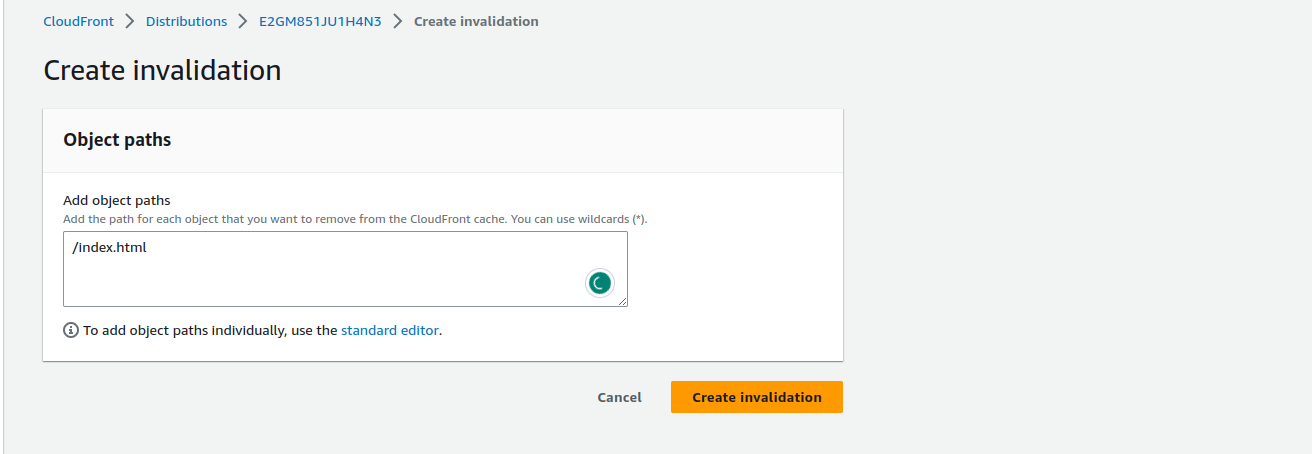
In Amazon CloudFront, invalidations are used to remove or update content that has been cached in the CloudFront edge locations. When content is cached, it is stored in multiple edge locations worldwide to improve delivery speed and reduce the load on the origin server.
Step 5: Secure access
Return back to Route 53 and you will see the CNAME record from the certificate manager, NS records and SOA record. You will also have the A record pointing to the S3 record. Click on the new record and you will see something like before. Click on the alias and now point traffic to CloudFront distribution. Click on create records.
Otherwise, you can also edit the A record that is pointing to the S3 endpoint which is of no use now.
Similarly, create a record with a www subdomain and choose www distribution with that. You can assign security certificate that you have created just earlier as it includes certificates for all the subdomain too.
It will take some minutes to access your website.
Now you will be able to access your website in a secure fast and reliable way with your own custom domain. Congratulations.
STEP 6: Implementing CI CD
CI/CD stands for Continuous Integration and Continuous Deployment (or Continuous Delivery). It is a set of practices and processes used in software development to automate the building, testing, and deployment of applications.
We will be using Jenkins and GitHub for the CI-CD process.
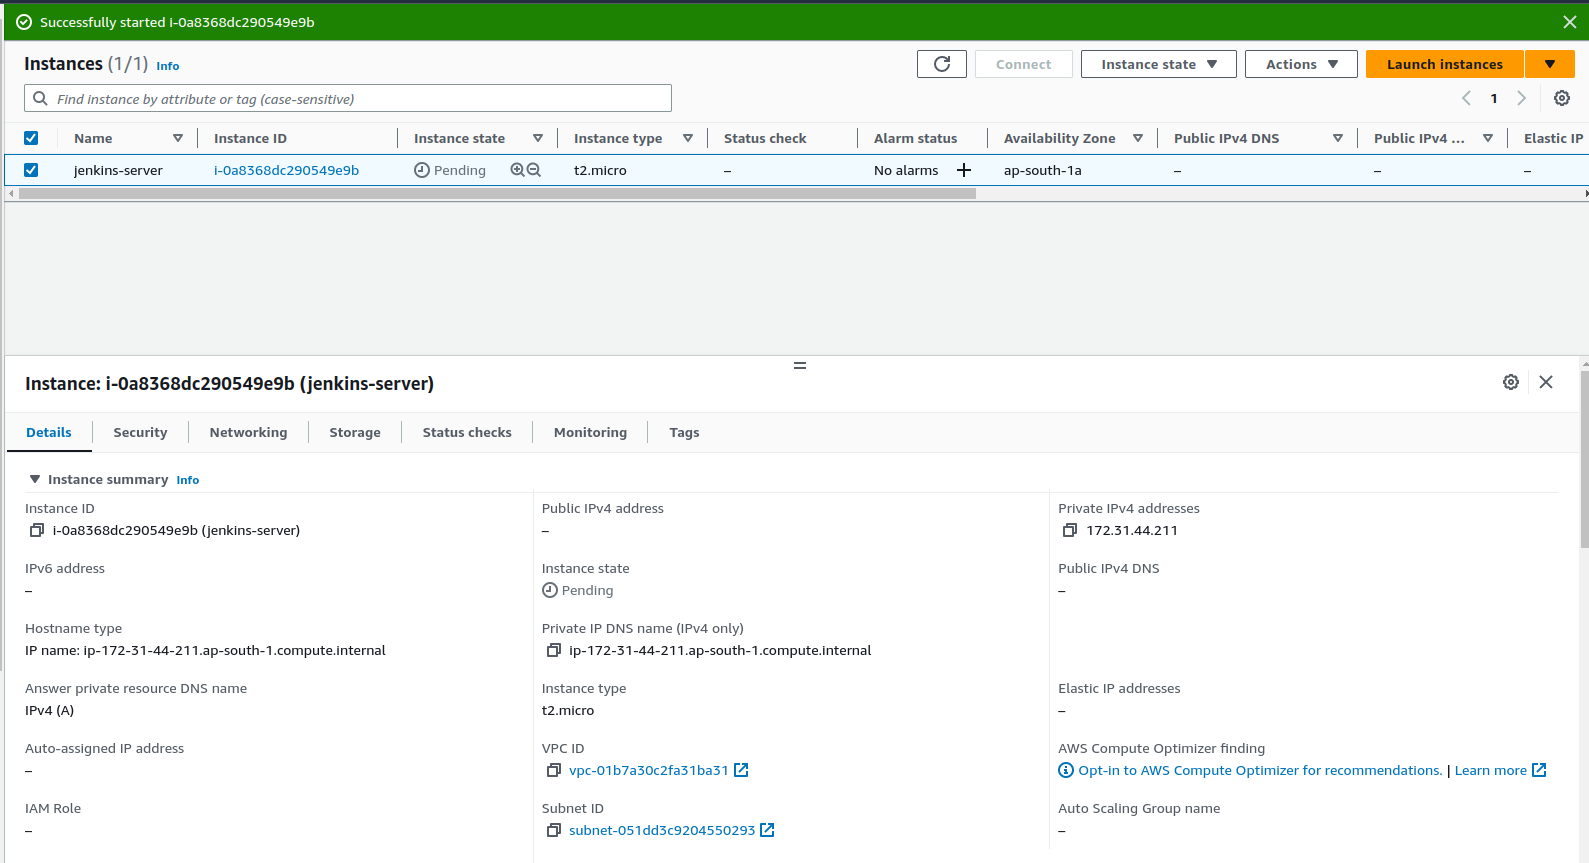
First, we will set up the EC2 instance. I hope you know how to set up an EC2 instance and install a Jenkins server in that instance allowing a security group for Jenkins port 8080.
Command to install Jenkins in EC2 instance.
  curl -fsSL https://pkg.jenkins.io/debian-stable/jenkins.io-2023.key | sudo tee \
    /usr/share/keyrings/jenkins-keyring.asc > /dev/null

  echo deb [signed-by=/usr/share/keyrings/jenkins-keyring.asc] \
    https://pkg.jenkins.io/debian-stable binary/ | sudo tee \
    /etc/apt/sources.list.d/jenkins.list > /dev/null

    sudo apt-get update
    sudo apt-get install fontconfig openjdk-11-jre
    sudo apt-get install jenkins
Now check if Jenkins is running or not.
http://your-instance-ip:8080
The configuration page will appear and configure as per your need.
Now, create an IAM user with the S3Fullaccess policy for now. This IAM user will be used to configure credentials in Jenkins to run AWS CLI in Jenkins.
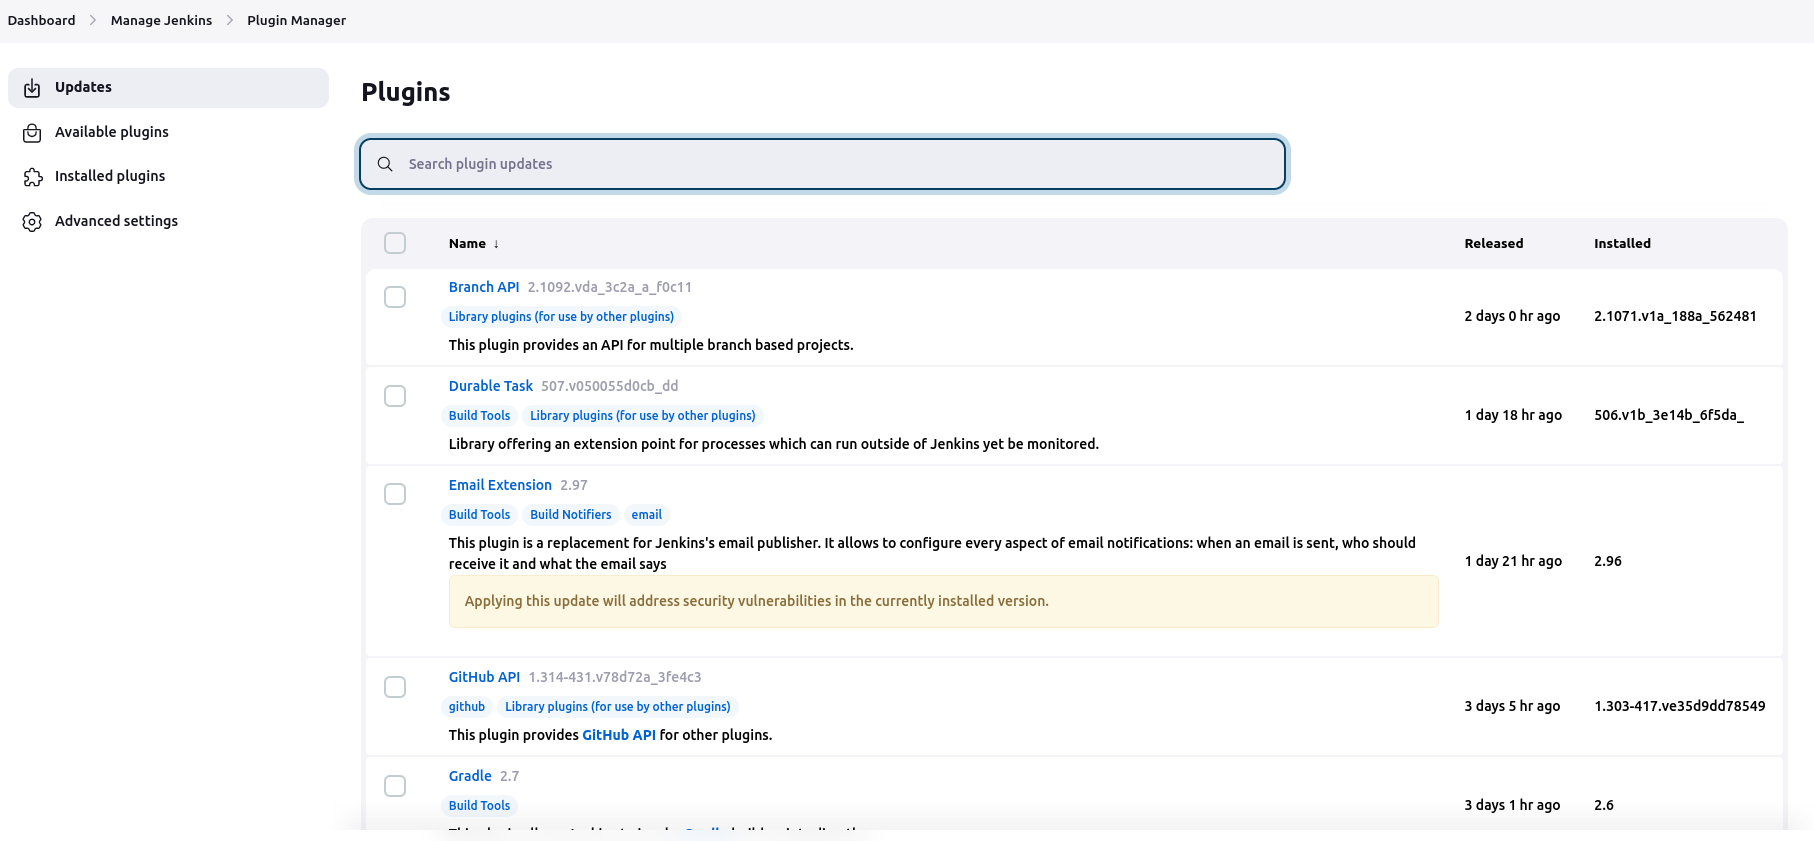
Goto Jenkins -> Manage Jenkins -> Available Plugins
Type AWS Credentials. You will see a plugin from CloudBees. Then, install it.
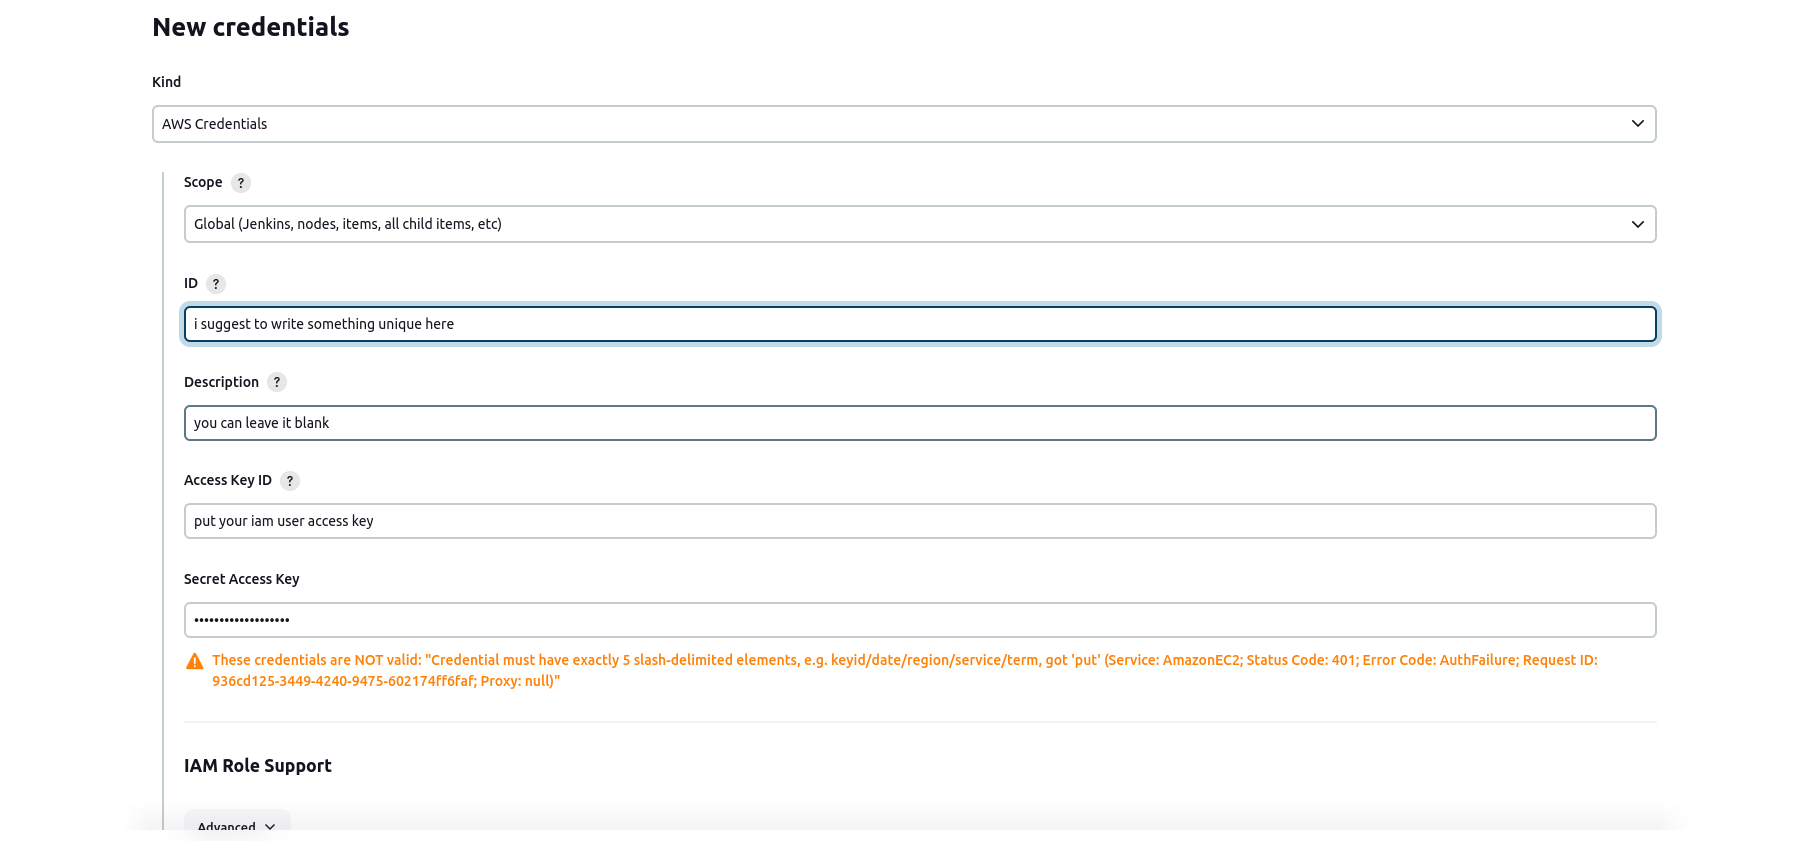
Goto Jenkins -> Manage Plugins -> Credentials
Click on Add Credentials in the global.
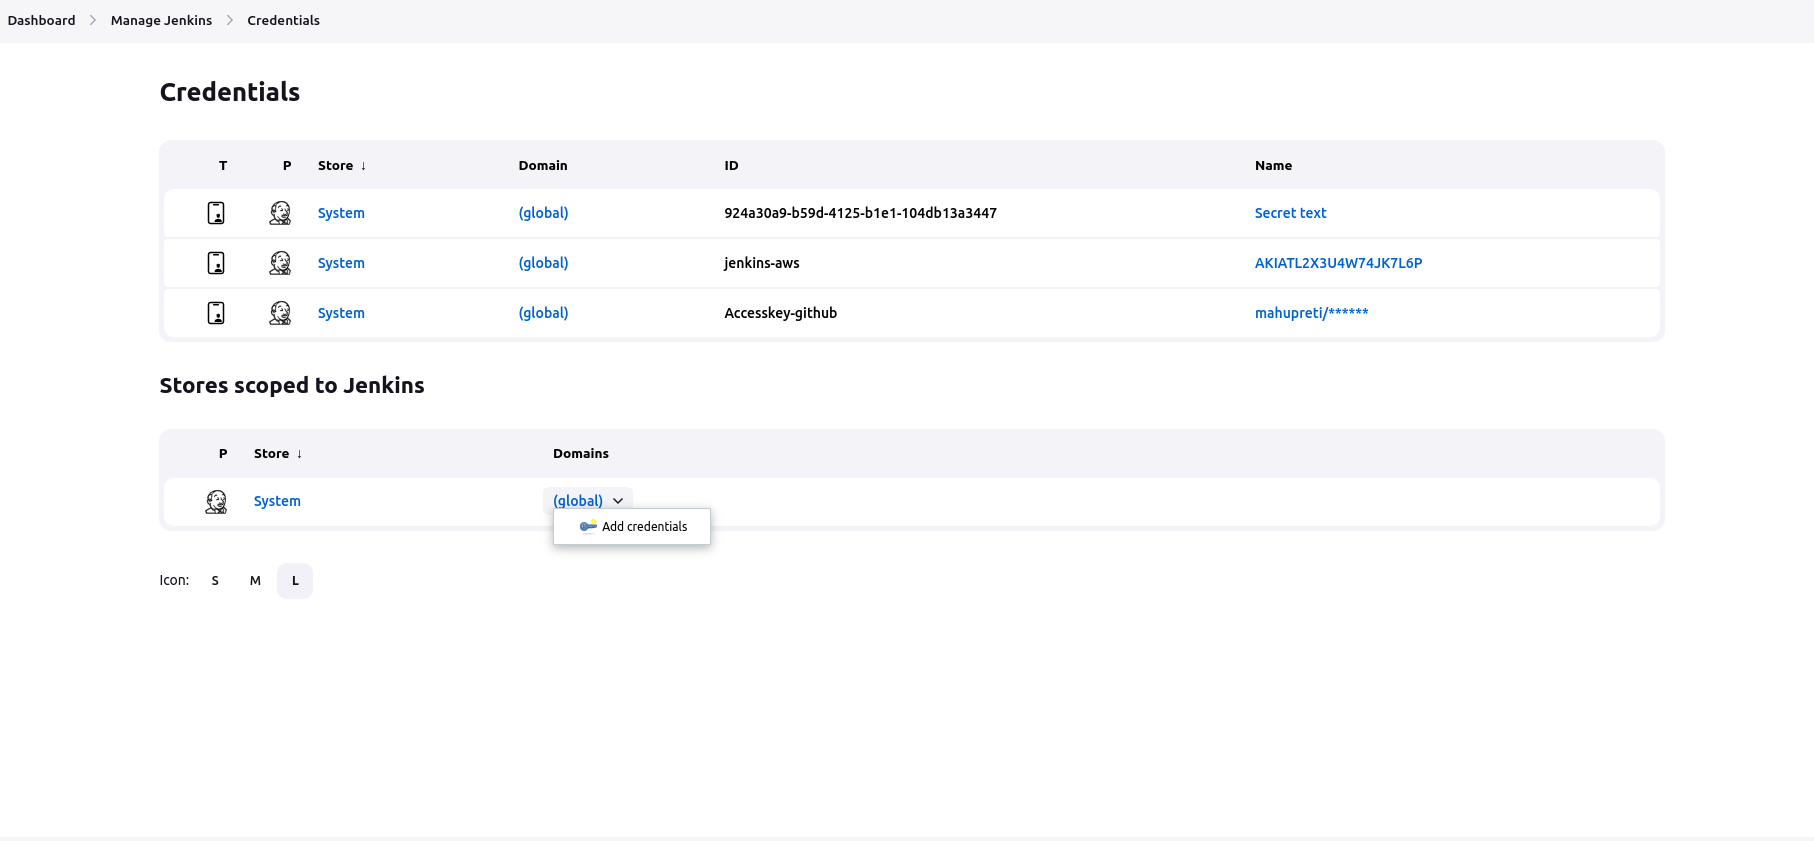
Then Choose AWS Credentials in the drop-down and fill in the IAM User's Access Key and Secret Access key that you have created.

Go to your GitHub repository.
Note: Your repository should be public(A secret key must be set up in jenkins for private repo, so we will be using public repo).
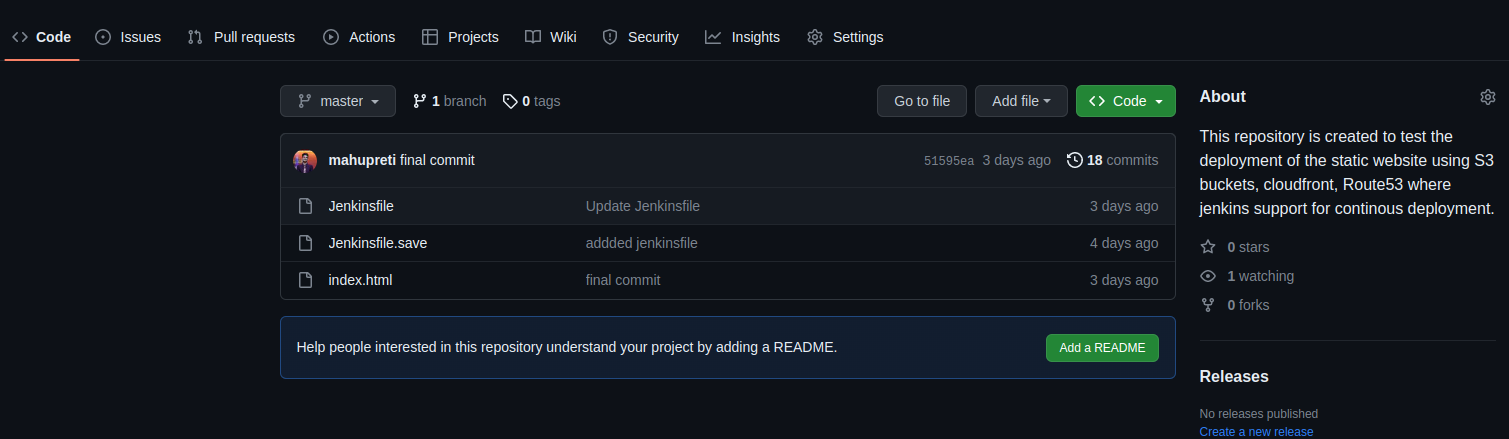
Did you see there is one file named Jenkinsfile? So, I have already created here but you haven't created it yet. It's now time to create that file in your repo because it is the file Jenkins looks in default to run the pipeline of code.
Add the Jenkins file with the code below and push it into the repository.
pipeline{
    agent any
    environment {
    AWS_DEFAULT_REGION = "us-east-1"
    THE_BUTLER_SAYS_SO = credentials('jenkins-aws')
    }
    stages {
        stage ('Build'){
            steps {
                echo "Building stage"
            }
        }
        stage ('Test'){
            steps {
                echo "Testing stage"

            }
        }
        stage ('Deploy to S3'){
            steps{
                echo "Deploying"
                sh ' aws s3 cp ./index.html s3://mupreti.com.np '
            }
        }

    }

    post{
        success {
            echo "success"
        }
        failure {
            echo "failure"
        }
    }
}
This is the Jenkins pipeline which runs and deploys our index.html from GitHub to our s3 bucket named mupreti.com.np(in my case).
The region is one where the S3 bucket is created.
So, our Jenkins file is ready. We have remained working to create a job in Jenkins and webhook in Github.
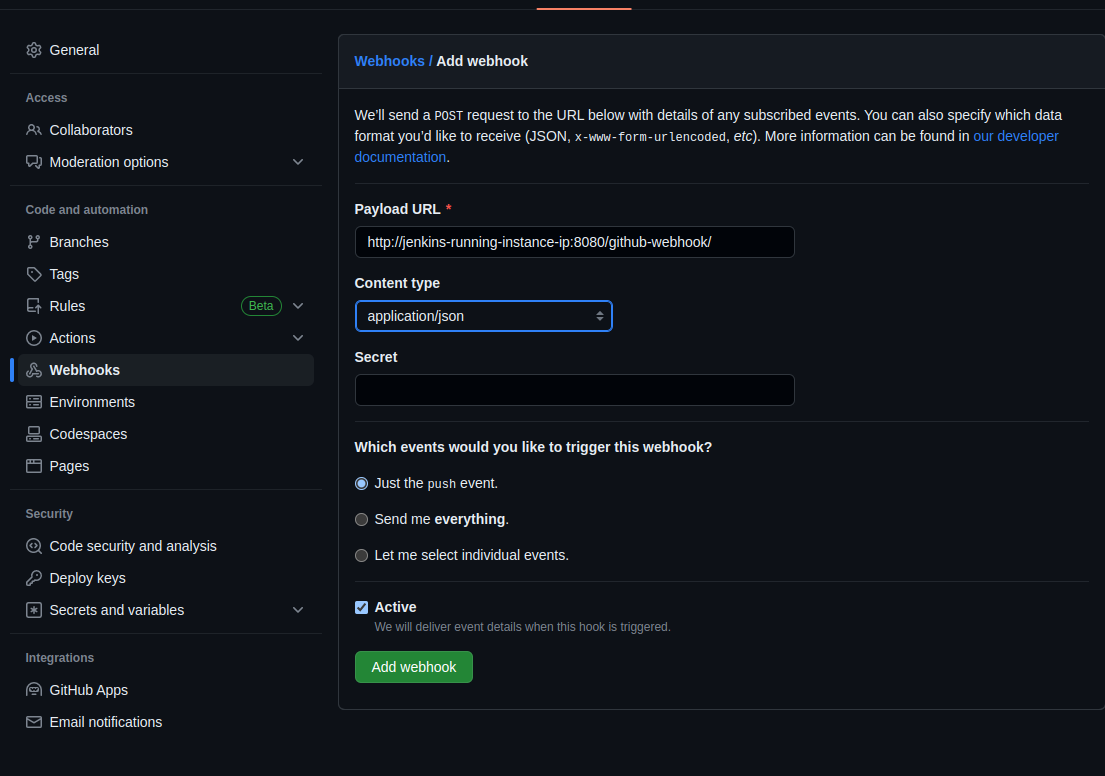
Goto Github -> Repositories -> Repository setting -> webhooks -> add webhook ->
Payload URL: http://jenkins-running-instance-ip:8080/github-webhook/
Content type: application/JSON
Which events would you like to trigger this webhook? : Keep just the push event.
Add webhook.
Now, Goto Jenkins -> Dashboard -> Create New Item
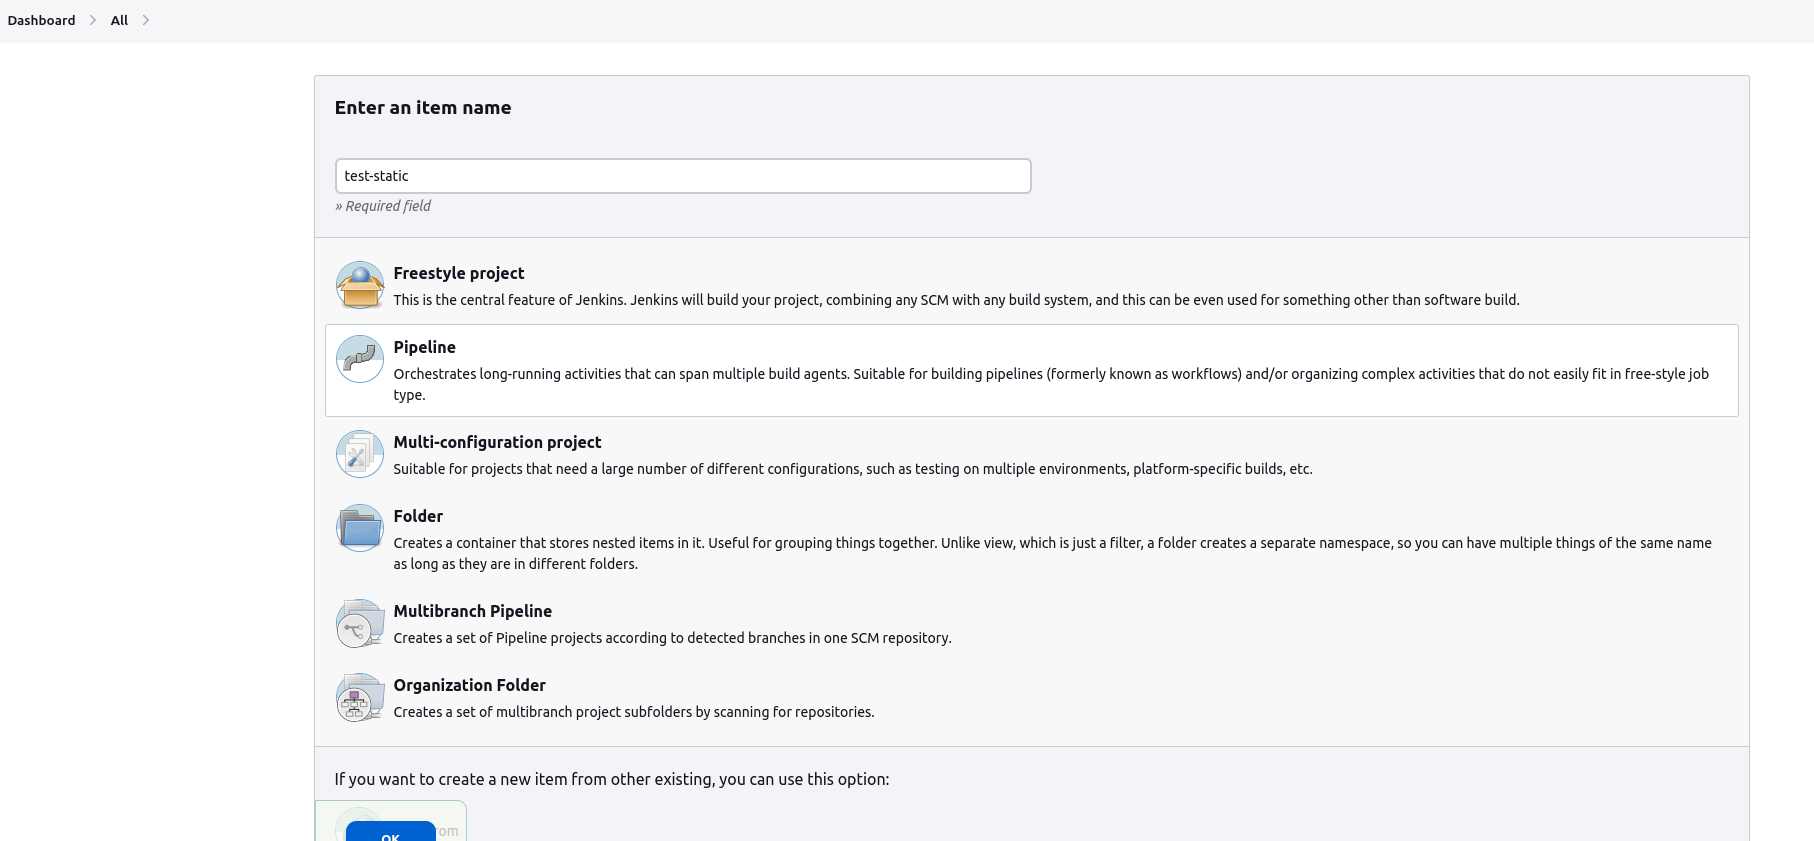
Name: Your desired name
Project style: Choose Pipeline
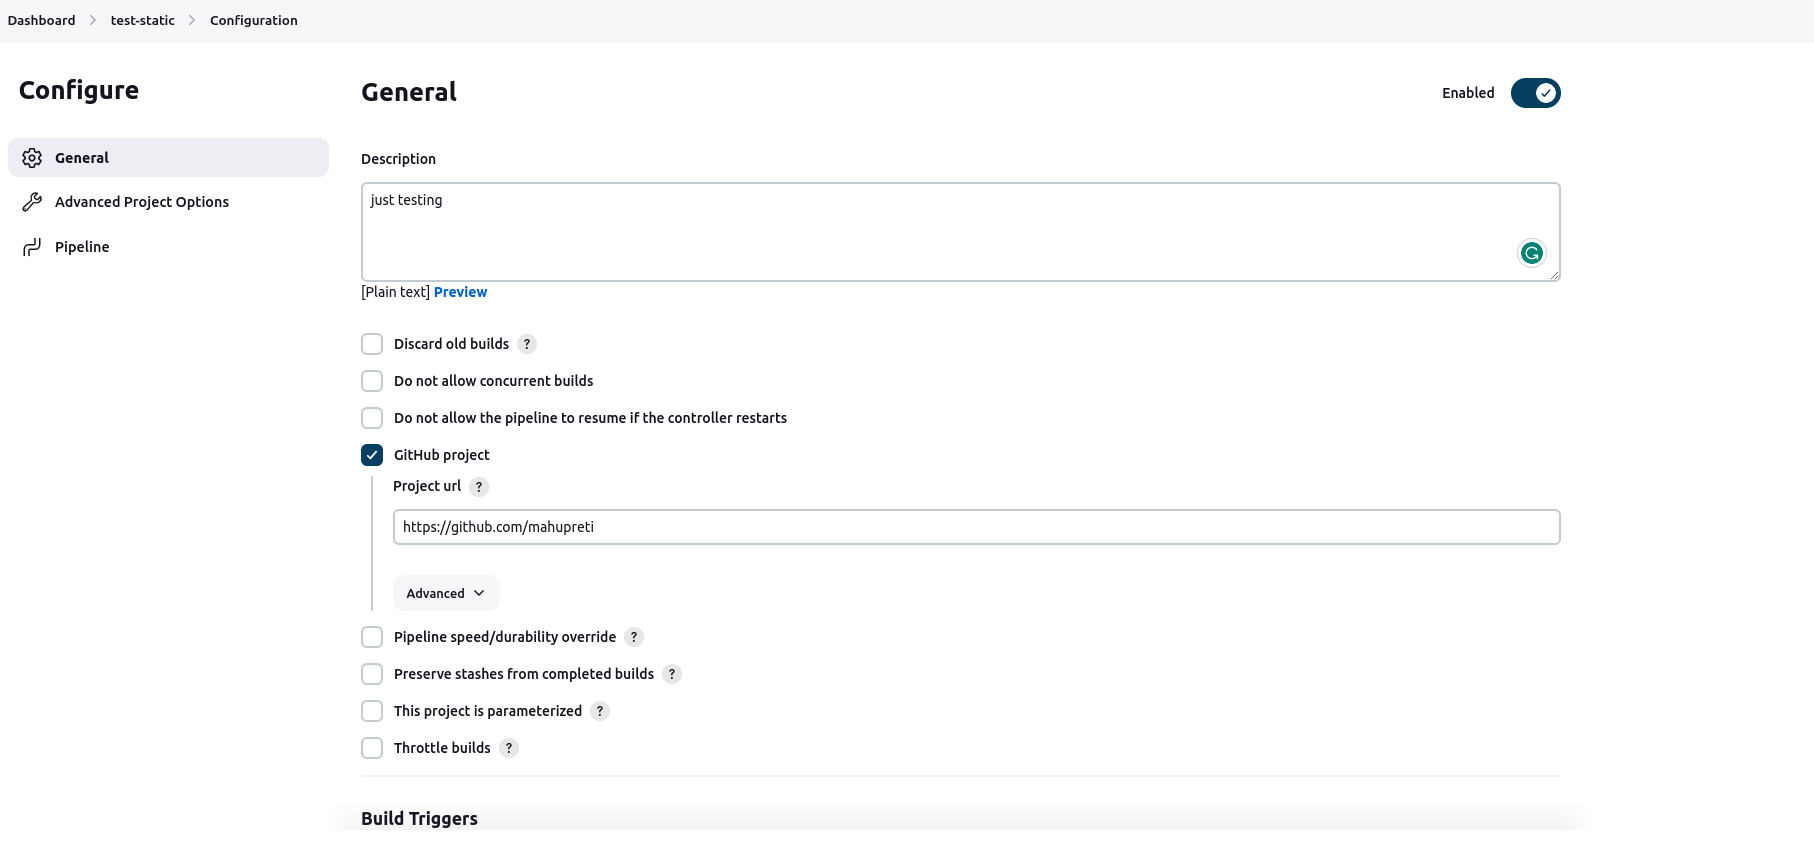
Description: Describe what you are planning to do.
Choose Github project: Insert your GitHub link
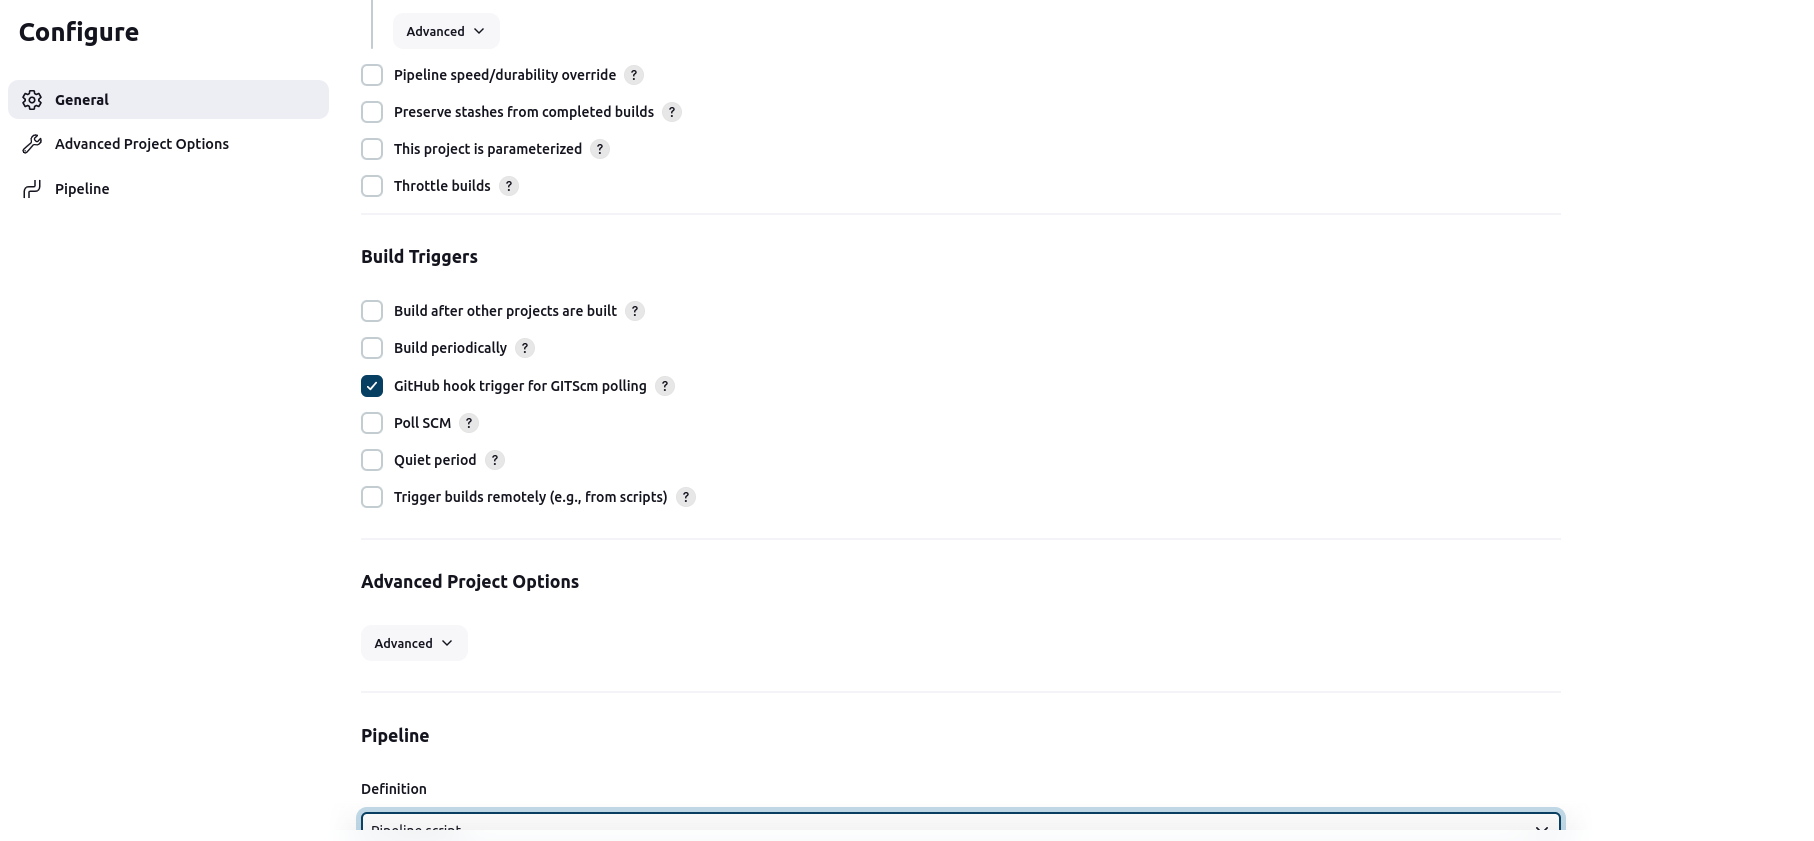
Don't forget to checkmark the GitHub hook trigger for GITScm polling
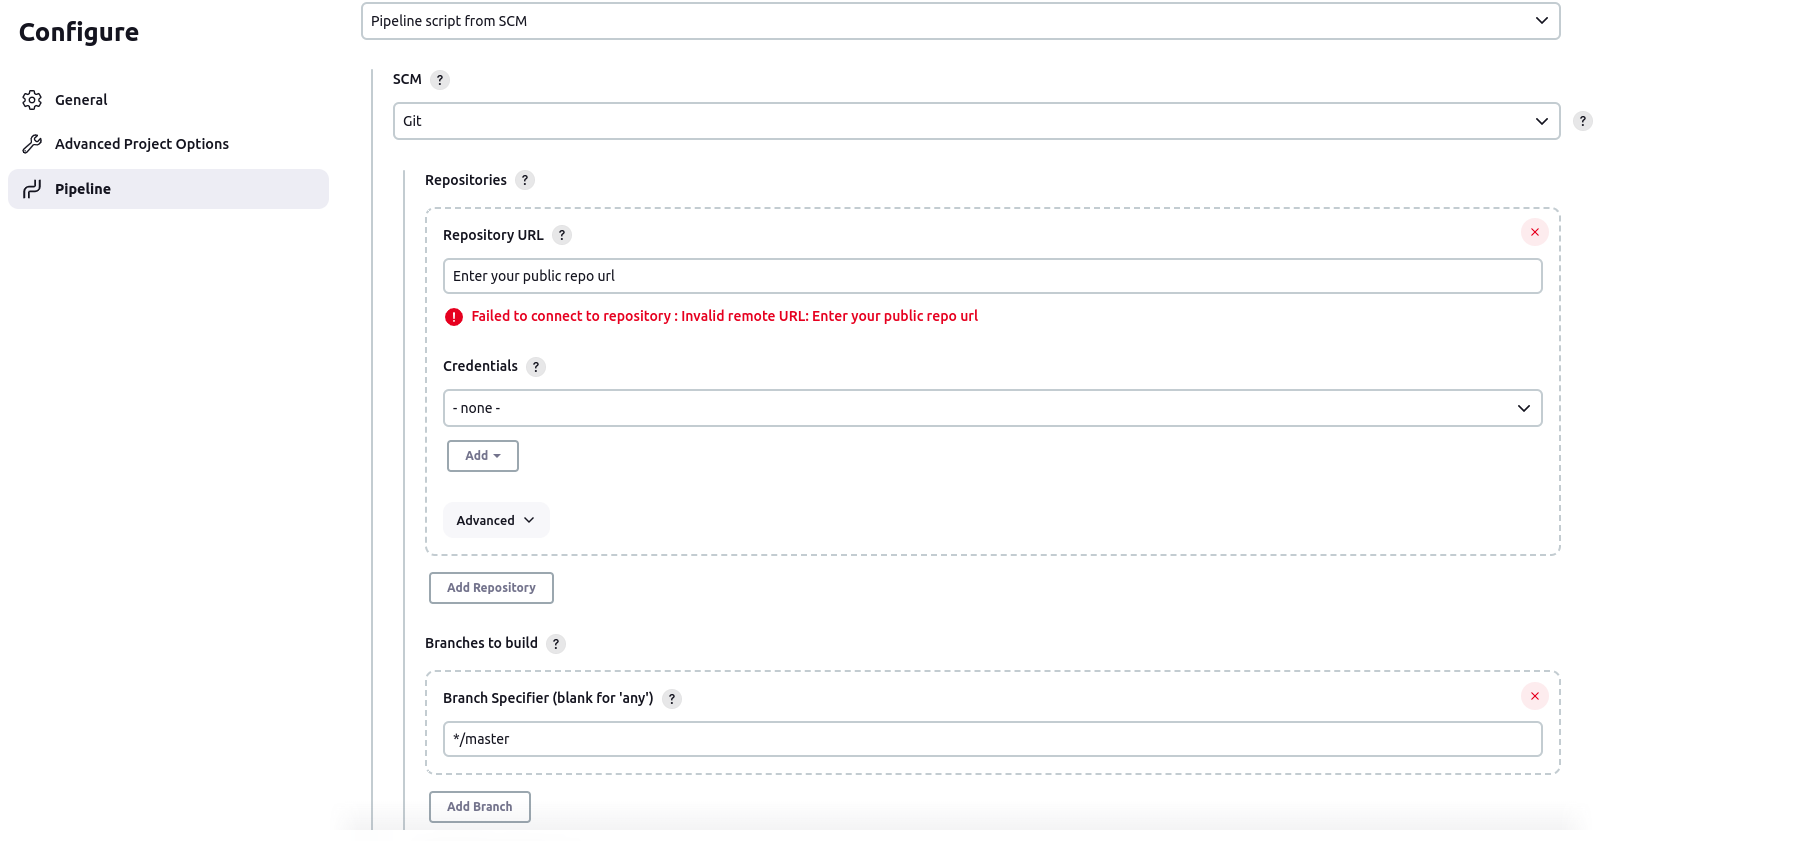
Pipeline: Choose Pipeline script from SCM
SCM (Source Code Management): GIT
Repository URL: Your GitHub repository URL
Credentials: Since it is a public repository, we won't need it for now.
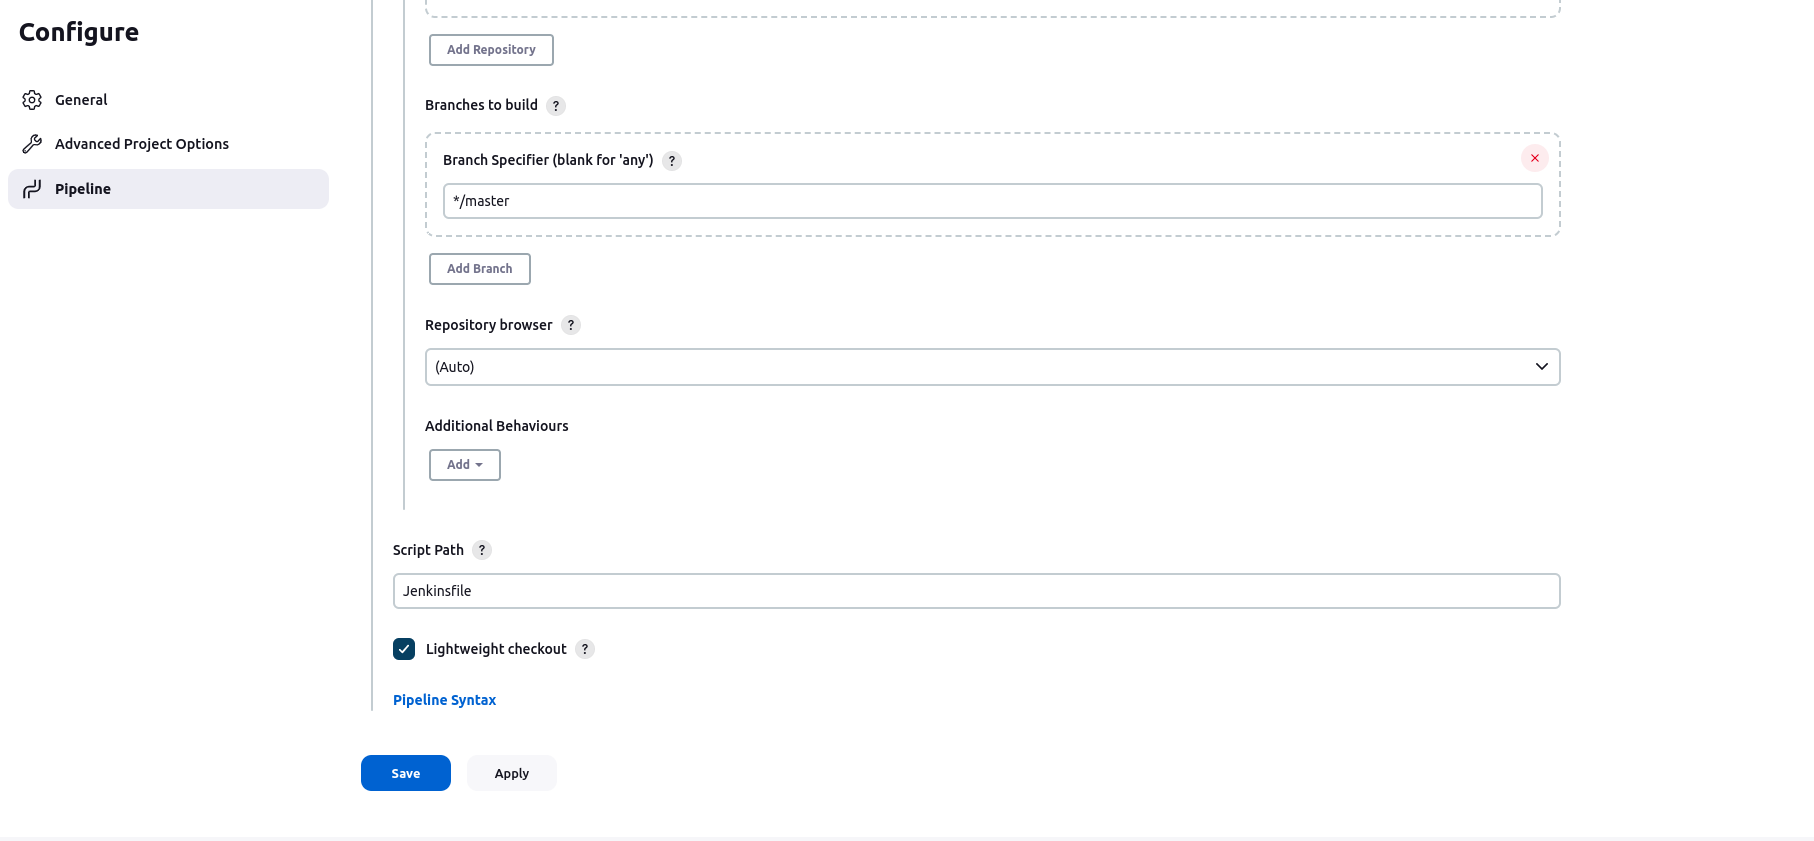
Branch specifier: Specify the branch where your code is located.
Script Path: Jenkinsfile ( That we have included in our repository)
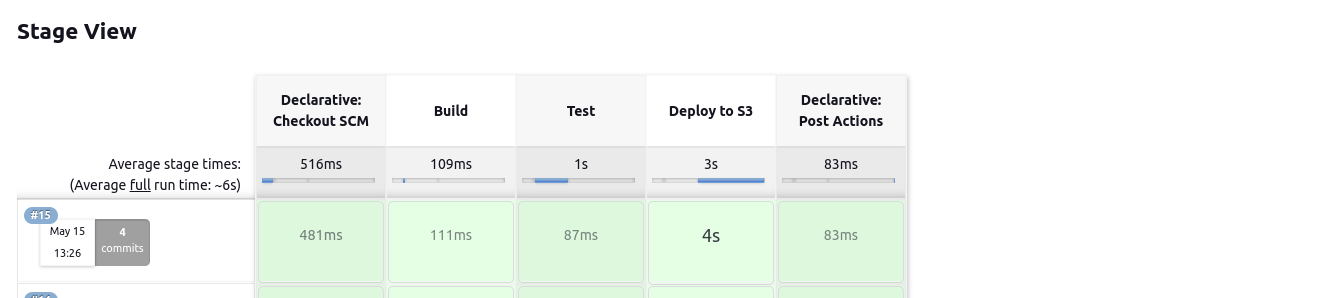
Now save and click on build now. You should see something like this if built correctly.
Congratulation! You have finally deployed a static website using the CI-CD pipeline. You might ask a question how is this CI CD? I have configured everything and still I am clicking on the build. So, how on earth does this thing work? Well, now when you commit some changes in your branch that you have specified, automatically Jenkins build starts and Jenkinsfile starts to run which then automatically deploys the new code into the S3 bucket.
You will have to wait some minutes to see the change. It might take maybe an hour sometimes but the change will definitely occur. It's because CloudFront caches the new content into the edge locations in different parts of the world.


